Part I · Play
Tactical Play
Every round’s a puzzle with a clock on it, and you get to see all the pieces before you move.
In most games, tactics means finding a bonus: flank for +2, high ground for +1. Zi’Dara doesn’t work like that. Before anyone moves, the GM puts everything that’s coming this round on the table: what it’s doing, who it’s aimed at, and how hard. You can see the whole problem. The trouble is, you’ve got more problems than actions.
So in Zi’Dara, tactics comes down to choices, and everyone’s got one action a round to make them with. What do you answer, and who answers it? Who Defends, who takes the hit, and what do you let ride? What do you ignore completely, because the stake matters more than the spear? Whose roll do you put your action into? And where do you stand when the round ends?
This chapter’s about those choices. The rules themselves are in The Core, Conflict and The Archetypes, apart from movement and range, which live here. The rest of the chapter is about using them well, whether you’re on a grid or playing it in your head.
The Five Choices of a Round
Everyone gets one action a round, and your stride, a few words and dropping something are free. With that, the crew makes five choices together every round.
- Answer. Which telegraphs do you stop? An answer can stop anything, whether it’s a blow, an alarm or a slammed door, but it costs an action, and if it fails, you’ve walked straight into it.
- Defend, take the hit, or let it ride. Whatever nobody answers lands at the end of the round. Who Defends, who steps in front of a friend, and whose Armour’s big enough to let it ride on one defence roll? A d12 Armour can shrug off a d4, but a d2 Armour shrugs off almost nothing.
- Press. What do you do with the rest? Stakes, clocks, weak points, the thing the scene’s actually about.
- Team up and shape. Whose roll do you put your action into? Every action in a roll brings its steps and a split, so two of you on one thing is a much bigger roll than either of you alone. Then do you want one big die, several intents, or advantage?
- Stand. Where are you when the round ends? Who can reach you, who can you reach, and who’s within your stride if they need you to Defend them or take the hit?
Make all five on purpose and it’s a good round. The great rounds are the ones where one action solves two problems.
If nothing’s worth your action this round, hold it: do nothing apart from your stride, and you’ve got two actions next round. There are other ways to an extra action too: spend 1 Resolve, come out of hiding, cash in your Confidence when it’s fired up at d12, or use a trait like Second Wind. An extra action can be its own roll, or go into the same roll as a combo.
Movement and Range
You play Zi’Dara on a grid first, where 1 square is 1 unit, about five feet.
- Stride is free. Every character has a base stride of 3 units. Every round you can move your stride without spending an action, whether that’s before, between or after your actions.
- Move action. Spend your action to go further. Roll whatever makes you fast here, plus the action. That’s usually your Move set action, like Vesk’s Title, run the rooftops and her grappling line. The number you roll is how many extra units you move. Split it into several dice and they add together. Movement’s the one roll in Zi’Dara where dice add.
- Diagonals count as one. It keeps things quick.
- Difficult ground, like deep snow, a slick floor or a crowd, costs 2 units a square. Sure-Footed ignores it.
- Your sheet can change your stride. Light on my Feet adds 2 units, and so does the Stride Boon. A Stride Burden takes 2 away, and a Heavy Catch on something you’ve attuned takes 1, to a minimum of 0. A Teleporter’s stride can be a teleport of up to 10 units.
- Getting something out of your bag takes your action, but putting it away is free. See What you carry.
Rule
No reactions, no opportunity attacks. You can walk right past a guard and nothing lashes out at you for moving. Threats control space with their telegraphs, like cut off the way to the door or grab whoever runs, so you always know what moving will cost before you move. Moving doesn’t get you out of a telegraph aimed at you, though. That one lands wherever you end up, and diving behind cover once it’s aimed is a way of answering it, so roll for it. Only a telegraph aimed at a place, like a fire or a falling chandelier, can be walked out of.
Reach and range
How far a bow, a thrown knife or a spell reaches is the story’s call. The bands are a guide, so don’t go getting a ruler out.
| Band | Grid | What reaches it |
|---|---|---|
| Close | Next to you (1 unit) | Fists, blades, a whisper, a hand on the shoulder. |
| Reach | 2 units | Spears, polearms, whips: anything with Reach. |
| Near | Across a room, or down a street | Thrown and Ranged weapons: knives, slings, shortbows, pistols. Most magic. A shout. |
| Far | Across a town square, or a field | Longbows and crossbows: anything Long. Magic that goes beyond. |
| Beyond | Further | The story decides: a siege engine, a sniper’s rifle, a working that spans the city. |
Line of sight comes from the story. If something solid’s in the way, you can’t hit through it, and neither can they. That’s what cover is. It decides what’s possible, and it doesn’t add steps. Stand behind a wall and the archer on the roof has to telegraph at someone else, or come down.
ExampleMovement at the table
Vesk has Light on my Feet, so her stride is 3 + 2 = 5. In one round she moves those 5 units for free, then spends her action to Move across the rooftops. Her Move is her first Title, run the rooftops and her grappling line, plus the action, so she’s on 4 steps, a d8. She rolls a 6, and that’s 11 units in total.
Bram’s stride is 3. He moves 3 units for free, then spends his action on a Move. Nothing on his sheet makes him fast, not even a Title, so it’s the action on its own: 1 step, a d2. He rolls a 2, its top face, so he gets 1 Aura back, and that’s 5 units in total. He’s no runner, and his sheet says so.
Weapons and What They Let You Do
A plain weapon is just what it is. It counts as a line whenever it fits, so it’s a step on your roll, and it lets you do what that weapon does: a sword cuts, and a spear keeps them back. An attuned weapon counts through its own permissions instead. Wren’s longbow is shoot a longbow and hit anything I can see, and the bow doesn’t count again on top.
Weapons also come with properties, free with the weapon. They’re the things a weapon lets you do that bare hands can’t. The full list is in Weapon properties. At the table they sort into four jobs:
- Controlling distance: Reach, Thrown, Ranged, Long. You’re hitting them from where they can’t hit back. A spear holds a doorway, and a longbow holds a whole street.
- Getting through: Piercing, Breaker. A crossbow bolt doesn’t care about Armoured, and a war hammer doesn’t care about Shield. When everything keeping a threat going is something your weapon ignores, one win takes it out.
- Holding and moving: Grapple, Sweep, Charge. Pin one enemy where the others can’t help it, or go at a whole line at once. Sweep puts one die on everyone within your reach, and it’s free. Unless you’re an Elementalist, it’s the way to put one die on a crowd.
- Surprise: Concealed, Quick. It’s the knife nobody found, drawn without spending an action.
Some properties are costs: Two-Handed means no shield, and Reload means an action to load it again after every shot. With one action a round, that’s your whole next turn, so a crossbow hits hard and then waits. The heavy hitters carry them for a reason.
Shaping Your Dice
How you split your steps is the most important tactical decision you make every round, and it’s the one new players rush. You get one split for every action in the roll, and going past 6 steps gives you one more on top, so 8 steps on one action can be three dice: a d6, a d6 and a d4 (the rules are in Splitting). Before you roll, look at the defence you’re rolling into.
- One big die against a hard defence. A d6 isn’t going to beat a d12 Warden very often, but a d12 will, sometimes. Don’t split into dice that can’t win.
- Several intents against a soft target, or one with a lot of problems. Three d8s out of a big combo can disarm a guard captain, drop him and break his nerve in one round. He rolls his defence once for the round, and every die that beats it gets its intent.
- Advantage when one thing has to happen. Say the sigil has to break this round. Put two dice on it, and the best one counts.
- Answer and act in one roll. A fighter on 8 steps can make it a d8 to parry the blow coming at her and a d8 to strip the brute’s shield, both from the same swing.
- A small die for a small job. Put a d2 on keeping an eye on the door. It’ll probably fail, but half the time it lands on its top face, and that’s an Aura back. It costs you a split, though, so do it when the big die can spare the step.
- An area die when there are many of them, if you’re an Elementalist. A d6 of fire and a d4 of area beats one d10 on one man when there are five men. It takes a split and no Aura, and if the area comes up short, 1 Aura puts +2 on it. You can always make it smaller than you rolled to keep your friends out.
- Watch the first roll. A threat rolls its defence the first time it’s attacked in a round, and that number stands until the round’s over. If the captain’s rolled a 2, everyone piles in. If he’s rolled an 8, put your dice somewhere else this round.
Rule
Tags decide your targets. A threat rolls its Challenge die once a round, the first time it’s attacked, and every die aimed at it that round has to beat that one roll. Its tags never make that roll harder, unless it’s Layered. Then it rolls a die for every tag it’s got left keeping it going, and its best die is the roll that stands. What tags do decide is which win matters most. Strip Reach and the spear stops outranging you. Strip what keeps it going and it falls. Go after what drives it and you might not need to fight at all.
Answer, Defend, Take the Hit or Let It Ride
You deal with every telegraph aimed at the crew in one of four ways. Fear, lies and pressure are telegraphs too, aimed at your Confidence instead of your Armour, and you answer them, Defend or let them ride the same way.
- Answer it when it’s big, when your defence is small, or when it does something Armour can’t stop, like raising the alarm or slamming the door. Friends can put their actions into the same answer. If a friend’s on a d2 Armour, answer for them. You can also answer by taking out whatever telegraphed it, or by taking away what it needs: disarm the crossbowman and his bolt never flies. See Answering a telegraph.
- Defend when one enemy’s throwing several dice at you, or at a friend with a small defence. It takes your action but no steps. When the telegraphs land, you roll your Armour (or your Confidence, against fear, lies and pressure) once for every die coming at you, and choose which roll blocks which. You can also pull one enemy’s whole attack off friends within your stride and onto yourself. A Guardian pulls every attack aimed at friends within their stride, whichever enemy it’s from, so threats have to pull the crew apart to get past one. See Defend.
- Take the hit when a friend can’t afford it and you can. Step in front of an attack aimed at someone within your stride, and it lands on you instead. It’s free, but you don’t roll to defend: you just take it, unless you’ve got the Boon that lets you pay 1 Aura to roll your Armour against it. Summons can do it too, and a summon that takes the hit just goes back to its slot. See Taking the hit.
- Let it ride when your defence is bigger than what’s coming, or when you’ve got something better to do. At the end of the round you roll your Armour once against all the blows, and your Confidence once against all the fear, lies and pressure, and everything aimed at you has to beat that one number. Ties go to you. If a blow gets through, the GM names the cost, and you can offer another that costs about as much (see When it lands). If fear, lies or pressure get through, you choose the cost yourself (see Confidence, below).
ExampleDefend, or take the hit
A Warden telegraphs two d10s at Isolde, a spear thrust and a sweep, and her Armour’s a d2. She’s within Bram’s stride, so he Defends and pulls the Warden’s whole attack onto himself. When it lands, the d10s come up 5 and 3, and Bram rolls his d6 Armour twice: 6 and 3. He puts the 6 on the 5 and the 3 on the 3, and the tie goes to him, so neither gets through. On one roll he’d have needed a 5 or better to stop them both.
Bram’s a Guardian, so if a second Warden had a spear on Dorrie as well, and she was within his stride too, he’d have pulled that one onto himself the same way. Anyone else who Defends pulls one enemy’s attack.
If he’d already spent his action, he could still step in front of the spear thrust for her. That’s free, but there’s no roll, so it lands on him.
Offering a different cost is tactics too. A step off your Armour stays off until you pay a smith or spend a downtime slot, so it makes every fight after this one harder. A Hurt clears at the end of the scene, unless it fills a bar. Then you write a Catch in it that stays until you spend a downtime slot healing it, and your Confidence drops a size as well. A step back on your Aspiration costs nothing in this fight, but it costs you something in the long game. The Party Goal belongs to everyone, so ask before you spend it. And a broken item is always something you carry, because attuned things can’t break.
Tags Are the Battlefield
You never need to ask how hurt something is. Read its tags instead. If it’s got Tough, that’s its hit points, and the GM says what’s left every time it drops.
- Keeps it going: how many wins it takes. Four of them makes for a long night, so look for another way.
- Comes at you: what its telegraphs can do. Strip Reach and its spear stops outranging you. Strip Commanding and every one of its followers telegraphs a step smaller.
- Drives it: how to end the fight without winning it. You can buy the greedy ones, let the frightened ones go, and show the loyal ones what their master really did.
- Hidden: there’s always more on a boss than you can see. Spend your action on Study. It’s almost never wasted.
Openings
An opening is how a big threat falls in one blow, and there are three kinds.
- Its weak point. Find it, then hit it. It’s the only opening that ends a Boss in one blow.
- It’s helpless. It’s bound, asleep, or there’s a knife already at its back from someone it never saw coming. Get there first and the next one of you finishes it. Against a Boss it tears two tags away instead. That won’t finish a Boss off, but it’s a big step towards it.
- Getting around everything that keeps it going. Shove the shielded, fortified captain off a narrow bridge into the river, and neither his shield nor his position does anything for him. Use the ground, use the right weapon, and think about what its tags actually protect it from.
Conditions are teamwork
A condition is a win you can save for later. Once it’s on, decide whether to keep the passive or spend it now.
- Stack the passives. A threat that’s Exposed, Blinded and Taunted is up to three steps easier for everyone, on every roll those conditions fit, until they fade.
- Spend before it fades, or before it’s broken. The die shrinks every round. When the GM telegraphs a threat shaking one off, that’s your cue. Spend it on your turn and it never gets the chance.
- Burning, Bleeding and Poisoned strip tags with no roll. Against a d12 defence, that’s worth more than any swing.
- Look after each other. A ward or a blessing costs you your action and saves a friend a Hurt. It goes on one friend, and if you split it, the second die can put it on another friend you can touch (see Wards and blessings). Heal rolls are a Healer’s, and they work mid-scene: beat a friend’s wound die and a box clears. Anyone can pay 1 Aura to clear one box with no roll, though that still takes your action. Every action you spend on a friend is one you’re not spending on the stakes, so pick your moment.
Stakes Beat Bodies
Most scenes have two or three stakes and a clock, and there are never enough actions to do everything. Crews coming from other games tend to kill everything first and then do the job, and in Zi’Dara that loses. While you’re grinding through a Warden’s fourth tag, the household wakes and the witness bleeds out.
Every round, ask yourself: what’s this scene actually about? Put your dice there. Send one character to hold the enemies off while the others work the stakes, and let the fight be the distraction. One Defend can pull a whole enemy’s attack off the people doing the work, and if it’s a Guardian Defending, it pulls every enemy’s.
Aura and Resolve
Aura’s for the small stuff, and it comes back all the time. Resolve is your character pushing themselves, so it pays for the big stuff, and it comes back slowly.
- Spend your Aura. It refills every scene, so a full tank at the end of a scene is Aura you never used. Spend it where it changes the die: one more line brought in turns a d8 into a d10, and that’s often enough. Your archetype’s +2 is the other good buy, because you pay for it after you roll, once you can see it’ll make the difference.
- Farm it, and share it. Every top face is 1 Aura back, and small dice land on their top face more often. When you’ve got a split to spare, peel off a d2 with a small intent. If you’re already full, the Aura goes to a friend in the scene.
- Let trouble bite. Let a Catch bite as often as you like, and take 1 Aura each time. It has to bring real trouble every time, and you don’t even need a Catch on your sheet: bring real trouble on yourself in the story and take 1 Aura. Do it when the scene can stand a bit more trouble.
- Other ways back. Killer Instinct, Battle Focus, and the Beat a threat and In your element Boons all bring Aura back. And when a great setup doesn’t land (you planned it, it was cool, and the dice said no), the GM can give you 1 Aura.
- Ties matter. A tie on the roll that ends the fight is worth an Aura, every time.
- Resolve buys the big things. You’ve got 1 for each Title, so 2 to start. Spend 1 to take an extra action, to reroll a roll you just failed, to go beyond what a permission normally does, to hold your ground when fear, lies or pressure get through, or to go at a threat when you’re shaken. An extra action can turn a round: put it into a friend’s roll, or into your own with another of your set actions (Fight with Sneak is a sneak attack). A reroll’s best when the threat rolled low, because its dice stay where they landed.
- Spend one every scene. You get 1 Resolve back at the end of every scene and all of it after downtime, so one a scene costs you nothing. If you’re out, let a Catch bite in a big way, one that changes the scene or costs you something you wanted, and take 1 Resolve instead of the Aura. Straining a thread gets you one too (see Bonds and threads), and so can great roleplay, when the GM says so.
Confidence
Confidence is how you’re holding up right now, and it swings up and down during a scene, so play it the way you play your Aura. Every scene starts you on d6, a size up in clothes that fit, and it’s back on d6 when the scene ends.
- Push it up. Stop all the fear, lies and pressure that come at you in a round and it goes up a size, and taking a threat down sends it up a size too (in a combo, that’s everyone who put an action in). If your Confidence is big, let the taunts ride on it: one good roll stops the lot and lifts you a size.
- Cash it in at d12. At d12 you’re fired up. Trade it for an extra action, or to clear a Hurt box, and you’re back on d6. It’s going back to d6 at the end of the scene anyway, so use it.
- Choose what it costs you. When fear, lies or pressure get through, you choose: let it shake you and drop a size, bury it and take a Hurt, or hold your ground for 1 Resolve. Dropping from d10 to d8 is cheap. Bury it when you’re low, unless the Hurt fills a bar, because a full bar drops your Confidence a size anyway.
- Keep off d2. At d2 you’re shaken, and every time you go at a threat it costs you 1 Resolve. When you’re low, take a breath: spend your action and come back up a size, as far as d6.
- A Bard lifts the crew. A Bard’s song can answer all the fear, lies and pressure coming at the Bard or at friends who can hear it with one roll, or lift every one of them a size, as far as d10.
ExampleThe swing in a fight
A brute’s roar gets through to Bram two rounds running, and both times he lets it shake him: d6 to d4, then d2. He’s shaken, so he spends 1 Resolve to go at it anyway. Next round he takes a breath instead, comes back up to d4 and leaves the brute to Wren.
Across the room, Ash stops the one taunt aimed at her and drops two of the brute’s dogs, so she’s gone from d6 to d12. She’s fired up, so she cashes it in for an extra action, throws fire at the brute twice, and she’s back on d6.
Roles Come From Your Sheet
Every crew finds its roles, and every character plays a few. Each of your archetypes gives you something only it can do, and your biggest set actions show what you do all the time, so look at both and you’ll see your roles.
- The wall. Plate, a shield and hold the line on your Fight. You Defend, take the hit, and hold the narrow place, and if you’re a Guardian, your Defend pulls every attack aimed at friends within your stride. That’s Bram.
- The blade. One big set action for hurting things. You strip tags, take openings and end things. A Warrior’s dice explode in a fight, and a Bloodsworn gets 3 more steps for every Hurt they take. Wren’s Fight is a d10.
- The hunter. You pick the target, and the crew piles in. A Hunter marks it, and everyone who goes at it rolls the Mark die as well, as one more die against it. That’s Wren.
- The opener. Your split goes on a second intent: disarm, trip, blind or expose. You put conditions on threats for the blade to spend.
- The keeper. Wards and blessings, on one friend or two with a split. You put conditions on friends and keep their Hurt track clear, and if you’re a Healer, you heal them in the middle of a scene. That’s what Isolde’s Ward is for. She’s an Oracle as well, so she can keep them safe before anything lands, by taking steps off the threats’ telegraphs.
- The eye. A big Study, with lines like read the land for an ambush or know the history of anything old. You find weak points and hidden drives, and tell everyone else where to aim. If you’re a Scholar, a Study you win can make something true instead, and the whole crew can use it this scene.
- The voice. A big Talk. You talk threats down, turn them, buy them, and end fights that were never worth having. If you’re a Face, you put influence on a threat, and each of its dice your best influence die beats does what you say instead. That’s Dorrie.
- The leader. Only a Leader leads. You build an order or a rallying song from your set action, then hand its steps out to friends who can hear or see you, for their own rolls this round, and those steps don’t have to fit. Bram barks his orders with his Talk. A Bard’s song works on nerve instead, and lifts every friend who can hear it a size of Confidence, as far as d10.
- The runner. A big Move or Sneak. You work the stakes and the clocks while everyone else is busy. Coming out of hiding gets anyone an extra action, and if you’re a Shadow, the dice you hid with go in your shadow pool for later. That’s Vesk.
- The storm. You put one roll on the whole room, with an Elementalist’s area, which is free, or with a Sweep weapon. That’s Ash.
The other archetypes bring jobs of their own, like a Maker’s tags or a Summoner’s souls. If you’re stuck, the Title ideas say which archetypes suit each idea.
A Round on the Grid
Bram, Vesk, Ash and Wren are taking a wagon over a toll bridge, and the bandits who hold the bridge have other ideas. That’s four players, so the GM’s got about 20 steps a round to telegraph with, 5 for each of them.
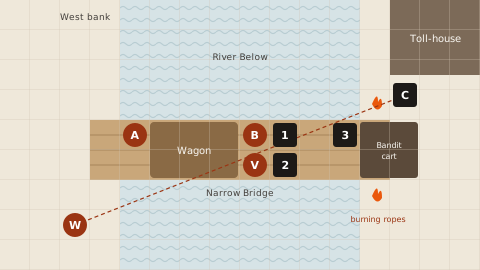
The toll bridge, round one. One square is one unit. B Bram, V Vesk, A Ash, W Wren on a rock on the west bank, her line of fire to the captain dashed. 1–3 bandits. C the toll captain in the toll-house doorway. The bandits’ cart blocks the east end of the bridge, and the anchor ropes behind it are burning.
Rule
The scene.
Stake: Get the wagon across, Challenge 3. In the way: Blocked.
Scene clock: The bridge burns, d8. When it runs out, the bridge falls.
The toll captain, Challenge 4. Comes at you: At Range (a crossbow), Commanding. Keeps him going: Shield, Fortified (the doorway). Drives him: one hidden tag.
Three bandits, Challenge 2. Comes at you: Belligerent. Drives them: One of Many. Nothing keeps them going, so it’s one good win each.
Ground: Narrow Bridge (two abreast, no more), River Below.
Example
GM: The captain levels his crossbow at Ash, a d8. Bandits one and two hack at Bram, a d6 each. That’s a step bigger because the captain’s watching, and Commanding says so. Bandit three winds up to hurl a torch into the wagon’s straw, a d6 at the stake, and it’s got one answer: if it lands, the wagon’s on fire. And the fire’s running along the ropes, so The bridge burns will tick at the end of the round.
So that’s 4 + 3 + 3 + 3 = 13 steps out of about 20, and the GM holds the rest back. It’s round one, and the bandits think they’ve got this.
The crew looks at the map. There are four problems, and one action each to spend on them: the bolt at Ash, two blades at Bram, a torch at the wagon, and the fire. And there’s one opportunity nobody’s said out loud yet: the river.
Wren goes first, from her rock.
Example
Wren: I haven’t moved, so Marksman’s Eye counts. My Fight’s my first Title, my bow’s shoot a longbow and hit anything I can see, and the Eye. With the action that’s 5 steps, a d10. The captain’s 11 squares away across the water, which is Far, and a longbow reaches Far. I’m shooting the crossbow out of his hands.
GM: Nobody’s gone at him yet this round, so roll his d8 with yours.
Wren: 8, and his d8’s a 5. GM: The crossbow spins off the toll-house porch into the water, and his bolt at Ash never flies.
That 5 is the captain’s defence for the rest of the round, so anyone else who goes at him before it ends has to beat it. Wren’s answered the bolt without rolling an answer. She took away what it needed instead.
Bram has two blades coming at him.
Example
Bram: I could Defend, but they’re only d6s, and I’d rather put one of them in the river. My Fight’s my first Title, hold the line and the hammer, with the action 4 steps. I’ll bring in River Below for 1 Aura, so that’s 5 steps, a d10, to knock bandit one over the rail.
GM: Roll his d4.
Bram: 7, and his d4’s a 2. GM: He goes over the rail. Splash. His blade goes with him.
Ash isn’t being shot at any more, so she turns to the torch.
Example
Ash: I’ll step up onto the wagon with my stride, so I can see over Bram and Vesk. Scare them off is my first Title, throw fire, make a threat stick and my ember stone, with the action 5 steps. I’m splitting it into a d6 to scare them and a d4 for a burst. I’m an Elementalist, so the burst’s free.
GM: Neither of the other two’s been attacked yet, so roll both their d4s.
Ash: My d4’s a 3. Three squares would catch Bram, Vesk and the wagon, though, so I’ll make it 1, on the planks between bandits two and three. My d6 is a 3.
GM: Bandit two rolls a 3, and bandit three rolls a 1.
Ash: Three’s done. Two’s a tie, and that goes to him unless I pay an Aura. I’ll leave it. He’s got Bram in front of him. GM: Bandit three drops his torch into the river and goes in after it.
Ash’s Killer Instinct gives her 1 Aura for taking a threat down. She’s full, so it goes to Bram, who spent one on the river. Taking a threat down sends her Confidence up a size as well, d6 to d8, and Bram’s went up the same way when his bandit hit the water.
Vesk has the best idea at the table.
Example
Vesk: The captain’s Fortified because he’s in a doorway looking at the bridge, and his shield’s pointing that way too. So I go over the side on my grappling line, along the underside of the bridge, and up behind him.
GM: That’s 8 squares the long way round.
Vesk: My stride’s 5, so I need a Move for the rest. My Move’s 4 steps, but run the rooftops doesn’t fit swinging under a bridge, so I leave it out. That’s my first Title, the line and the action: 3 steps, a d6. …4. That’s 9, so I’m behind him. GM: You’re crouched on the toll-house step at his back, and he’s got no idea you’re there.
End of Round 1. The bolt, the torch and bandit one’s blade all went with whatever sent them. Bram let bandit two’s d6 ride, so he rolls his Armour once against everything aimed at him: his d6 comes up 5 against the bandit’s 4, so nothing lands. Nobody worked the fire, so The bridge burns steps down to a d6.
Round 2: The opening
Example
GM: The captain grabs the rope of the toll bell to call the rest of the gang off the far bank. That’s a d8 at the stake, and it’s got one answer: if it lands, there’s a new tag in the way, Reinforcements. Bandit two, alone on the bridge now, hacks at Bram again, a d6.
That’s 4 + 3 = 7 steps. The GM’s still got about 20, but there’s nothing left worth spending them on, which means you’re winning.
And Vesk’s right behind the captain. His shield and his doorway both face the bridge, so she’s around everything that keeps him going, and that’s an opening. The next win against him takes him out, whatever he’s got left. Her Sneak on its own is a d8 against his d8, though, and that’s a coin toss.
Example
Wren: I’m in. I’ve got an arrow on the string, aimed at his face. “Don’t.” I still haven’t moved, so it’s my Fight again, 5 steps.
Vesk: And my knife’s at his back. My Sneak’s my first Title, move unseen and Silent Step, with the action 4 steps. I’ll bring in fight dirty with a knife for 1 Aura, so 5. With Wren’s 5 that’s 10 steps between us, a d12 and a d8, and they both go on “yield, now”, so it’s advantage.
GM: Roll his d8.
Vesk: His d8’s a 6. I’ve got 5 on the d12 and 8 on the d8, and that’s its top face, so my Aura’s back. The 8 beats his 6. GM: He yields. Sweating, he tells you the toll money’s in the strongbox upstairs, and it can all be yours. That’s his hidden tag: Can Be Bought.
Wren and Vesk both put an action into taking the captain down, so they’re both up a size of Confidence, d6 to d8. Bandit two sees his captain on his knees and remembers he’s One of Many, so he jumps. Nobody rolls for it, because the story’s already decided it, and his blade goes with him.
That leaves the cart. Bram walks up to it with his stride and tips it in the river. His Lift and carry is his first Title and lift what two men can’t, with the action 3 steps, and he brings in River Below again for 1 Aura, so it’s 4 steps, a d8. He rolls 6 against the stake’s d6, which comes up 2. Blocked is gone, there’s nothing else in the way, and Ash takes the reins and drives the wagon across.
Two rounds. Nobody on the crew got hurt. The captain had two tags keeping him going, and he fell to one win because Vesk got around both of them and Wren made it close to a sure thing. Ash’s burst took her one split and no Aura, and making it smaller kept Bram and Vesk out of it. Nobody spent an action on the fire, either: it needed four rounds to drop the bridge, and the crew only needed two. And the river did more damage than any weapon.
Playing Without a Grid
You don’t need a map. Use the bands instead of squares.
- Close, Reach and Near are within your free stride of each other, so moving between them costs nothing.
- Far takes a Move action to cross.
- Beyond takes more than one round.
When it matters where someone is, like who’s in the doorway or who can reach the lever, say it out loud and the GM writes it on a card in the middle of the table. A rough sketch on scrap paper counts as a grid too.
Five Mistakes Every New Crew Makes
- Killing everything first. The scene has stakes, so work them.
- Splitting into dice that can’t win. A d6 and a d4 against a d10 are two long shots. Look at the defence before you split.
- Answering everything. A failed answer lands with no defence roll at all, so let the small ones ride when your Armour’s big.
- Never studying. Every boss has something hidden, and it’s usually the way to win.
- Sitting on a full tank. Aura refills every scene, and you get 1 Resolve back at the end of every one, so spend them.